
Pro Tips with Esben #47
Since October is Cybersecurity month, I thought that with the recent changes, it would be a good time to take a closer look at this feature along with showing off some lesser-known functionality and how you can use it all to manage vulnerabilities in your IT environment.
Risk Insights aims to provide you with a view of all vulnerabilities in your IT environment, taking data from both NIST and MSRC, we crosscheck the data that you’ve scanned with the Common Platform Enumeration (CPE) of the vulnerabilities. This allows us to match vulnerabilities with the assets that they are present on.
Finding a Vulnerability
One of the first things you might want to do when first entering the Risk Insights area is find a specific vulnerability you might have seen in news publications, or that your boss or SecOps team has alerted you to. Obviously, doing a search is the easiest way to quickly find a CVE. If nothing comes up, you’re all set and it’s unlikely that the vulnerability is present in your environment.
But what if you still want some info on that vulnerability? Well, since Lansweeper contains all vulnerabilities with CVSS 3 scoring, it means that the data is out there. It’s just not being shown to you because it hasn’t identified devices in your environment with that vulnerability. One simple trick to avoid this is by modifying the URL.
Your URL should be something like the following but with additional parameters at the end.
https://app.lansweeper.com/redirect-to/security-insights/vulnerabilities/details/summary?cveId=CVE-2021-4140
You can take this URL and change the CVE to any vulnerability you would like to have more info about, basically making it your own NIST database, but with the added benefit that if the vulnerability is detected in your IT environment, it will also show that.
Vulnerability Prioritization
One of the main challenges with having a big overview of all vulnerabilities is filtering out the static. Luckily with custom views, prioritization becomes easier by just setting up some basic views.
To start with, we want to add a few fields to our default view. Specifically, Privilege Required and User Interaction as these are two metrics that will certainly help with prioritization.
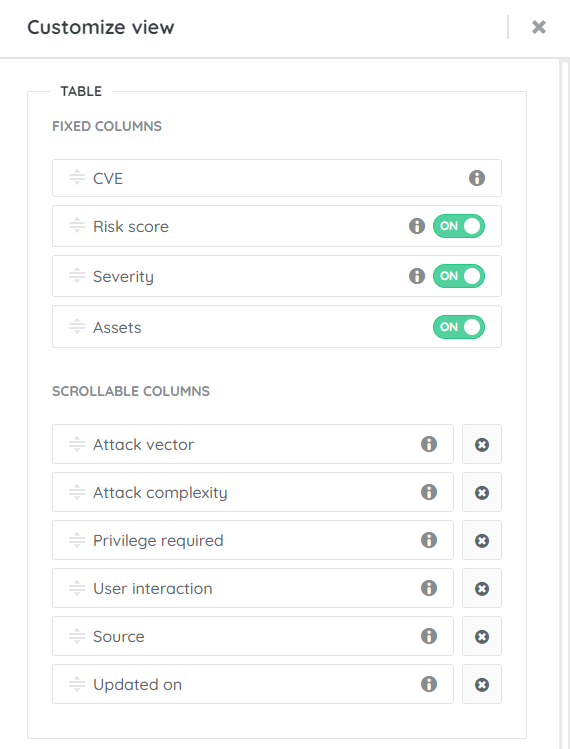
Next, we can prioritize multiple columns in specific orders. This will be more dependent on what you personally find more important. But my preference is to sort on:
- Attack Complexity
- Privilege Required
- Risk Score
- Assets
At the moment, we’re limited to 4, and these four looked to me to be the best mix to get the most critical results at the top.

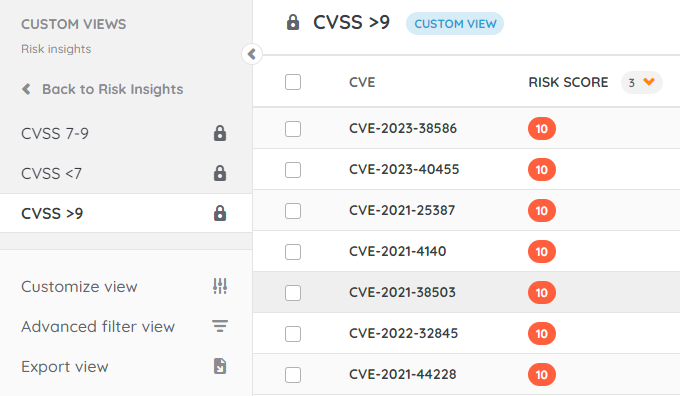
Now that we’re done with sorting, you can either save the view, or create multiple based on different CVSS scores. My preferred option is to created multiple smaller lists rather than one big list, so I added a filter to only show vulnerabilities with a CVSS score of 9+.
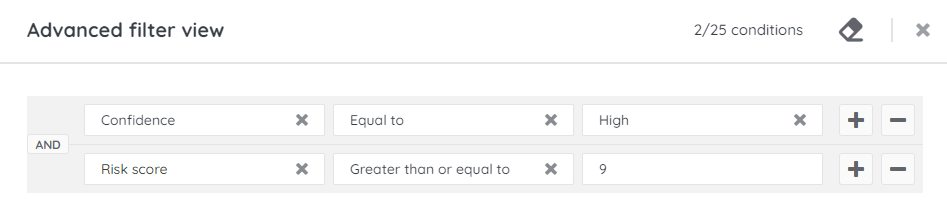
By creating multiple views, I limit the number of vulnerabilities I have to go through, this also gives you the option to apply different sorting options for each CVSS range if you so wish.
Ignoring Vulnerabilities
The last tool in your toolbelt is the option to just ignore vulnerabilities. This might be needed for multiple reasons. Maybe the vulnerability is only active if a specific feature of a product is enabled, there might be false positives from time to time, or the vulnerability is reported on an older devices that is no longer active. Whatever the reason, ignoring the vulnerabilities is as simple as selecting them and clicking the ignore button in the top right. You can always revert this change later.
Vulnerabilities in the API
Last but not least is the API, we’ve added the vulnerability data to the API, you can find the exact fields in the API documentation. If, for example, you want to add this data to your ITSM tool via a custom integration, you can do so now.