Intune Automations – Part 2
Contents
-
Step 2: Retrieve Lansweeper Report Step 3: Parse the CSV Output Step 4: Clean the CSV Data Step 5: Loop Over Each Device Step 6: Lookup Device with the Intune Connector Step 7: Check if Device Exists in Graph Step 8: Get Final List of Valid Devices Step 9: Ensure Final List is Array Step 10: Format Object URLs for Microsoft Graph Step 11: Get Current Group Members Step 12: Build a Map of Existing Group Members Step 13: Filter Out Existing Members Step 14: Branch if New Members Exist
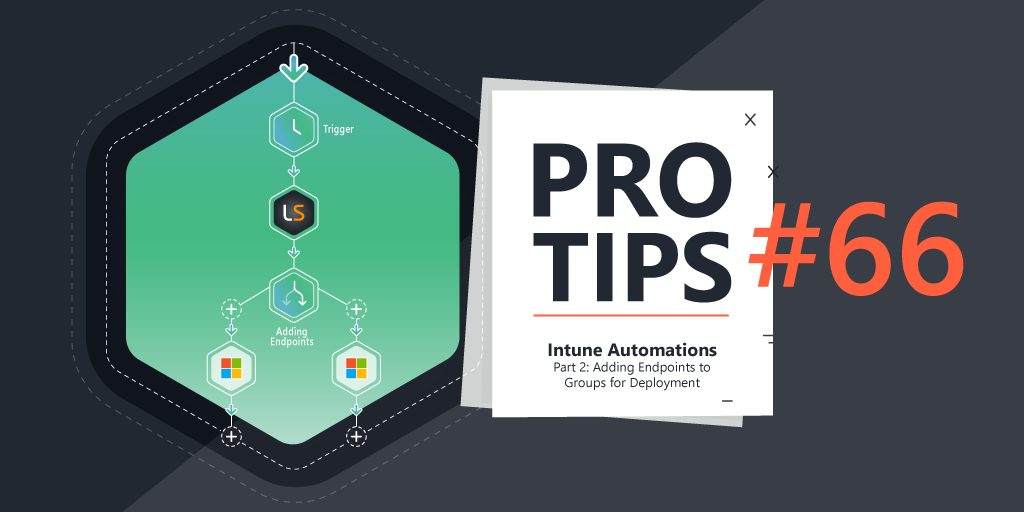
Pro Tips #66
In Part One of this series, we walked through the foundational steps of identifying our Intune-enrolled devices in Lansweeper and comparing them against an installed software list, by matching assets and writing the necessary IDs to custom fields.
Now, let’s take it further.
In this follow-up, we’ll show how to automatically identify Intune-managed endpoints missing Notepad++ and add them to a dedicated Intune group. This lets you scope a remediation policy (or app deployment) to only those devices where it’s needed – with no manual exports, no CSV wrangling, and no false positives.
What This Does
Here’s what the automation accomplishes step by step:
- Pulls a Lansweeper report of Intune-managed devices that are missing Notepad++
- Parses the CSV data:
- Cleans the CSV output: removes the header row and any trailing blank rows.
- Loops through each device, using its
deviceIdto look up the corresponding Microsoft GraphobjectId. - Persists valid Object IDs to a list during the loop.
- Formats the final list of verified Object IDs into Microsoft Graph directoryObject URLs.
- Retrieves current members of a specific Intune group.
- Filters out any already-present members to avoid redundant additions.
- Adds only new members to the group via the Graph API.
You can now scope a Win32 app deployment, configuration profile, or compliance policy directly to this group. In this case, it’s perfect for assigning Notepad++ to the devices that don’t have it.
Why This is Useful
Not every compliance or software rollout can be tied to static groups, and Intune doesn’t natively scan or inventory software installed on endpoints, so you’d end up scripting a solution with Powershell or similar to do this. By letting Lansweeper serve as the source of truth for installed applications, and using Flow Builder to process the data and integrate with Intune, you can:
- Catch install gaps and roll out software only where missing (or to whatever criteria you want to report on).
- Not have to use scripting to figure out installed software to create rules
- Automate the process
It’s a lightweight way to enforce baseline software, and the same logic works for anything you want to report on and throw into an Intune group (think security policies, Attack Surface Reduction groups for Defender rules, and compliance as well).
The Challenges
At the end of the video for part one, I confidently stated the many things that were possible now that we had the AzureID in a custom field, When I then sat down to put my money where my mouth was, I ran into three challenges that made this flow more complex than I expected:
- Microsoft Intune’s API requires full Graph URLs when adding group members (Thanks, Microsoft).
- You can’t just pass object IDs — you must format them as the full URL:
https://graph.microsoft.com/v1.0/directoryObjects/{id}.
- You can’t just pass object IDs — you must format them as the full URL:
- Device lookup requires a raw Graph API call.
- The current version (reminder this is in Beta) of Intune connector has no built-in action to query devices by
deviceId.Fortunately we have the ability to create a raw request to:https://graph.microsoft.com/v1.0/devices?$filter=deviceId eq '{deviceId}'&$select=id
- The current version (reminder this is in Beta) of Intune connector has no built-in action to query devices by
- Parsed CSV reports from Lansweeper include headers and trailing blank rows, which must be cleaned before performing any comparison logic and making any URLs to pass to Intune. We had that issue in the first part of this series, so nothing new there.. just pointing it out.
Prerequisites
Before deploying the Flow:
- Have access to Flow Builder – it’s currently in beta, so if you don’t have access, sign up HERE.
- You must have Created an application/registration and access in M365 (see Flow Builder Microsoft Intune Component)
- You must have completed Part One of the series and have your AzureADDeviceId written to a custom field for matched assets.
- You must have an Entra/Intune Group created
- You must have made a Win32 App for Notepad++ in Intune and have it assigned to the group
- You must have downloaded the below .zip file that contains the file to import into Flow Builder
Part One: Duplicating and Modifying the Pro Tip 66 Lansweeper Report
We are going to need to add the custom field ‘Intune_azureADDeviceId’ that we obtained with Pro Tip 64 to the report. First, duplicate the report, titled “Pro Tip 66 Windows Endpoints Missing Notepad++” and name the report something like ‘Intune Endpoints Missing Notepad++’

Then, edit the report and add the custom field ‘Intune_azureADDeviceId’ (or whatever you named it) to the first ‘Fields’ step:

Next, in the custom code ‘Fields’ step, click on the ‘Custom Fields’ button to get the GUID for the custom field, and copy it:


Then add the field to the custom code, following the syntax of the other fields (quotes, colon, etc.):

Next, in the ‘Group by’ step, add the field to the existing selections:

Then, in the next ‘Fields’ step underneath the ‘Filter’ step, add the field:

Finally, at the last filter step, click ‘+’ and add the ‘And’ Intune_azureADDeviceId > Exists:

Part Two: Importing the Flow File
Download (from above) the .zip file that contains the .yml file that you will import.
In Flow Builder, click the ‘+’ to add a workflow:

Choose ‘Import’:

Choose ‘Select a file’ > and either drag the .yml file over, or choose ‘Choose file’ and upload it:

Part Three: Modify the Imported Flow
Since this uses custom fields and custom code, I simply exported the file for us to use, versus making it a template. As a result, we need to adjust things inside the flow before it will work.
First, Click the ‘Configuration Wizard’:

The lansweeper connection is unique to your site – so we will need to delete the existing connection:

Now, we simply choose ‘+ Connection’:

And add the Lansweeper connection back:


Next, since I removed my own Intune Connection information (i.e. my own ClientID and Secret), we will need to ‘edit’ the existing Intune connection:

Now, Enter in the ClientID and Client Secret that you set up in Azure (see the pre-requisite section for info):

Next, since we deleted and recreated the Lansweeper Connection, we will need to edit and re-link the lansweeper connector that pulls the report to the newly created connection:

In the ‘Connection’ input field, click the ‘LS connection’ connection choice to re-link it:

Now, we need to fix the testing configuration, as you can see from the red warning. Click ‘Test Configuration’:

Now, double-click* (took me a minute to figure that out) the ‘Test Instance Configuration’ section:

Press ‘Connect’ to connect to Intune/M365:

A new browser tab will open, and you will be prompted to connect to M365. After you sign in, you will either see a success or a fail on the authorization. If you get a failure page, double-check your clientID and client secret:
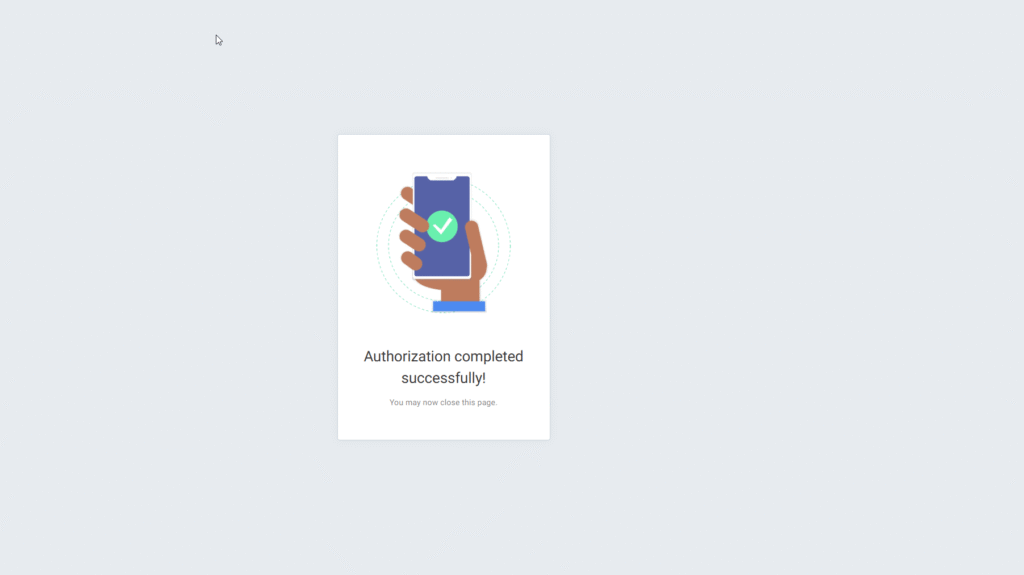
Once connected, click ‘Finish’:

Now, the red errors from the flow we imported should all be gone:

Now we need to put the reportID back in the Lansweeper connector that pulls the report info. To get the ID, pull up the report and copy it from the URL (it will be different than the ID I used):

Click the connector, and paste the Report ID in the field:

Now, take the ‘Object ID’ from the Intune group that you created:

And paste it into the Intune Connector that gets the group members:

Likewise, paste it into the Intune connector that adds endpoints to the group:

Now, everything should be good to go! Press ‘Run’ to test everything out:

You should see all green, and the flow will have successfully added the endpoints to the group! – if you get any errors, you can click the step and see the error.

Note* If you add any columns to the report, the field number for Intune_azureADDeviceId might have moved around. It is being referenced in the ‘Clean CSV Data’ code block, and also the ‘Loop Over Missing Notepad Endpoints’ section. If you get errors on the Loop step, check the test output for the ‘Parse’ step, expand index 0, and make note of the field number that ‘Intune_azureADDeviceId’ and modify the other steps with that number.

Conclusion
Congratulations! You now have a ‘dynamic’ static group, that you can attach the notepad++ win32 application remediation to!
Addendum: Technical Stuff
Here’s a breakdown of how this works:
Step 1: Flow Trigger (webhook) – I just put a webhook in here but you can make it whatever you want by editing it (example: a schedule).
Step 2: Retrieve Lansweeper Report
This step queries the Lansweeper API for a report listing all Windows devices that are missing Notepad++. It serves as the authoritative data source for the flow.
- Add the Lansweeper component with the “Get Report by ID” action.
- For the Connection input, select your Lansweeper Connection.
- For the Report ID, enter the reportID of the report (example:
6835373544e3bacbf53b63b8)
This ID corresponds to the report we just made in Lansweeper and can be found by looking at the URL of the report (the GUID right up to the question mark)
The output of the above is all in one payload – in order for it to be used in further steps, it must be parsed out into indexes.

Step 3: Parse the CSV Output
Lansweeper returns report data as raw CSV. This step turns it into a structured format (array of arrays) for filtering and looping.
- Add the CSV component with the “Parse” action.
- In the CSV input, select:
getLansweeperReportMissingNotepad.results.
This references the CSV output from the report in the previous step. - In the Delimiter field, enter a comma (
',').
Because Lansweeper exports CSV files with commas as separators.

Step 4: Clean the CSV Data
This code step removes the header row, empty rows, and any row missing a valid Entra (Intune) Device ID. This ensures only valid rows are processed downstream.
- Add a Code component.
- Paste the JavaScript function that:
- Removes the first row (headers).
- Optionally removes a trailing empty row.
- Filters rows where column 9 (Entra ID) is missing or blank.
- For the input, reference:
stepResults.parse.results.data.
This points to the array parsed from the CSV. Now, you will see that the headers are gone and index 0 now contains the first record of asset data.

Step 5: Loop Over Each Device
Now we process each valid row individually. This allows us to validate whether the device is still enrolled in Intune.
- Add the Loop component and choose the “Loop Over Items” action.
- For the Items input, select:
cleanCsvData.results.cleanedData.
This references the cleaned CSV output that has valid rows and Entra IDs only — it’s what we want to verify in MS Graph.

Step 6: Lookup Device with the Intune Connector
We now use the Intune Device ID to check if the device is still valid and retrievable from Microsoft Graph. If found, we extract its object ID for later group management.
- Add the Microsoft Intune component and select the “Raw Request” action.
- Set API Version to:
v1.0
This uses the production-ready version of Graph. - Set Method to:
GET
Since we’re retrieving data, not posting or updating. - In the URL input, enter:
/devices
This is the Microsoft Graph endpoint for Intune devices. - Under Query Parameters, add two:
$filter:deviceId eq '{{$loopOverMissingNotepadEndpoints.currentItem.9}}'
This filters for the device in Graph using its Entra Device ID from column 9 of the CSV.$select:id— this ensures only the device’s object ID is returned.
- For the Connection, select:
Microsoft Intune Connection.

Step 7: Check if Device Exists in Graph
We now create a branch that checks if the device lookup succeeded. If it did, we save the object ID; if not, we log the failure.
- Add the Branch on Expression component.
- Set the condition to:
isNotEmpty(lookupDeviceViaGraphApi.results.value).
This checks if Microsoft Graph returned a result for the queried device.

✅ If Device Found: Append ID to List
This captures the id field of the found device and stores it in a list for later processing.
- Add the Persist Data component using the “Append Execution Value to List” action.
- In Key, enter:
foundIntuneIdsList— this is a temporary list that will hold all valid object IDs. - In Value, reference:
lookupDeviceViaGraphApi.results.value.0.id— this points to the object ID of the device just found.

❌ If Device Not Found: Log the Miss
We log the lookup failure for auditing or troubleshooting purposes.
- Add a Log component.
- Use the message:
Device not found for Intune_ID: {{$loopOverMissingNotepadEndpoints.currentItem.8}}, Graph Response: {{JSON.stringify(getRequest.results)}}
Step 8: Get Final List of Valid Devices
Now that the loop is finished, we retrieve the list of verified Intune object IDs.
- Add the Persist Data component using the “Get Execution Value” action.
- In Key, enter:
foundIntuneIdsList. - For Default Value, type
[].
This ensures the flow doesn’t break if no devices were found. - (my small home lab instance only has two endpoints that needed to be found)

Step 9: Ensure Final List is Array
This adds extra safety to confirm the list is valid for processing — especially important for custom scripting.
- Add a Code component.
- Use the helper script to verify that the input is an array and return it as
memberIdsArray.
This prevents errors if the previous step accidentally returnsnull, a string, or an empty value.
Step 10: Format Object URLs for Microsoft Graph
We must convert each device object ID into a full directoryObjects/{id} Graph URL — this is the format required when adding group members. *This was the tricky part that took a lot of back-and-forth with GPT and Gemini to help me get the code right.
- Add a Code component.
- Use a script to loop through
memberIdsArrayand return:https://graph.microsoft.com/v1.0/directoryObjects/<id> - Output should be named:
memberUrls.

Step 11: Get Current Group Members
We fetch the list of devices already in the target Intune group. This helps us avoid adding duplicates.
- Add the Microsoft Intune component and select “List Members from Group”.
- In Group ID, enter:
b5399f33-209a-4c36-b4cd-436dcbeb83d1. - Select your Microsoft Intune Connection.

Step 12: Build a Map of Existing Group Members
This step builds a case-insensitive lookup map from the current group members for fast comparison. The code also marks the objects with ‘true’ for us to filter out existing members in step 13 below.
- Add the Collection Tools → Map component.
- For List Input, select:
getCurrentGroupMembers.results.value.

Step 13: Filter Out Existing Members
We now remove any devices that are already in the group from our list of candidates.
- Add a Code component.
- Use a script that:
- Loops through
memberUrls - Skips any URL that is already present in the lookup map
- Loops through
- Return the result as:
newMemberUrls.
Step 14: Branch if New Members Exist
If there are any new devices remaining, we proceed to add them. If not, we log and exit gracefully.
- Add a Branch on Expression component.
- Set the condition to:
isNotEmpty(filterNewMembers.results.newMemberUrls)
✅ Yes Branch: Add Members to Group
We now submit the filtered device list to Microsoft Graph to update the group.
- Add the Microsoft Intune component and select “Add Members to Group”.
- In Group ID, enter:
b5399f33-209a-4c36-b4cd-436dcbeb83d1 - For Member IDs, reference:
filterNewMembers.results.newMemberUrls - Use your Microsoft Intune Connection
Log Members Added
- Add a Log component.
- Message:
Added New Member: {{$filterNewMembers.results.newMemberUrls}}
❌ Else Branch: Log No Action Needed
- Add a Log component.
- Message:
No new members found to add to the group


Ready to get started?
You’ll be up and running in no time.
Explore all our features, free for 14 days.