- Lansweeper Community
- Knowledge Center
- Knowledge Base
- Configuring & Using the Helpdesk
- Resolve ticket attachment issues
- Subscribe to RSS Feed
- Bookmark
- Subscribe
- Printer Friendly Page
- Report Inappropriate Content
- Article History
- Subscribe to RSS Feed
- Bookmark
- Subscribe
- Printer Friendly Page
- Report Inappropriate Content
on
07-11-2019
08:30 PM
- edited on
07-05-2023
03:10 PM
by
Nils
![]()
In the helpdesk module, tickets can contain images and other attachments. Attachments can come from emails that were imported as tickets or can be added through the web console.
Attachments are stored in a folder on your Lansweeper server, not in your database. If a ticket comes in via email, its attachments are processed by the scanning server that is configured as your helpdesk mail server. If a ticket is created or viewed via the web console, its attachments are processed by your web server service, which is either IIS or IIS Express. In other words, both the Lansweeper and web server service need to be able to access the folder that stores your ticket attachments.
If your Lansweeper and web server service are hosted on the same machine, both services automatically have access to your attachment folder and you don't need to do anything to ensure correct functioning of attachments. If your Lansweeper and web server service are hosted on different machines though, both services do not automatically have access and ticket attachments can by default fail to load or return errors. With your services spread across different machines, you need to manually share the attachment folder on your web server, to ensure the scanning server can access it. The connection details of the shared folder must be submitted in Lansweeper as well.
Sharing the attachment folder
- On the machine hosting your Lansweeper web console, browse to
Program Files (x86)\Lansweeper\Website\helpdesk. - Right-click the "files" folder, and go to Properties > Sharing and select Advanced Sharing....
You must share theProgram Files (x86)\Lansweeper\Website\helpdesk\filesfolder specifically on the machine hosting your web console. - Tick the Share this folder checkbox and give the share a name.
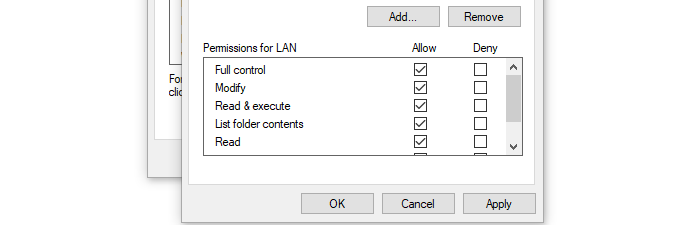
- Select Permissions, then Add... and select a user account to grant access to the share. This user account will be used by the scanning server to access the share.
- Tick the Full Control checkbox for the share and click Apply and Ok until you've closed all pop-ups.
For optimal security we recommend creating a new, dedicated user account just for accessing the helpdesk share. - Right-click the "files" folder, and go to Properties > Security and select Edit. Give the same share user full control to the folder.
- Browse to the Configuration > General Settings section of the Lansweeper web console.
- Tick the Service requires shared folder for attachments checkbox and enter the information of the share and share user account you created earlier.
-
Go to the scanning server you are using as your helpdesk mail server. If there are files in the
Program Files (x86)\Lansweeper\Website\helpdesk\filesfolder of this scanning server, move them to the same folder on your web console server. If you have multiple scanning servers, you can verify which one is configured as your helpdesk mail server by browsing to Configuration > E-mail Settings in the web console and reviewing the E-mail settings section.
Was this post helpful? Select Yes or No below!
Did you have a similar issue and a different solution? Or did you not find the information you needed? Create a post in our Community Forum for your fellow IT Heroes!
More questions? Browse our Quick Tech Solutions.
New to Lansweeper?
Try Lansweeper For Free
Experience Lansweeper with your own data. Sign up now for a 14-day free trial.
Try NowNew to Lansweeper?
Try Lansweeper For Free
Experience Lansweeper with your own data. Sign up now for a 14-day free trial.
Try Now


