Pro Tips with Esben #2
In today’s Pro Tips I will be taking a closer look at how Lansweeper’s alerts work and how you can create more effective alerts to be notified when you need to be. Even if it needs to be within minutes.
Alert Basics
Just in case you’re not familiar with Lansweeper alerts, here is the short version. Lansweeper has two types of email alerts, report alerts, and event log alerts.
Report alerts send the content of a report to you based on a time schedule you configure. The most classic example of this is sending yourself an overview of new assets scanned every week.
EventLog alerts send you an alert as soon as a Windows event has been scanned that meets the criteria you selected. For example a specific application crash event.
Regardless of which type of alert you use, it is always based on the data in the Lansweeper database. Why is this important you might think? Well, alerts can only be as fast as you scan the data.
Speeding Up Alerts
The most frequently asked thing about alerts is to get them faster, quicker. This makes sense, you want to receive a notification as soon as possible when things go wrong. There are two components that impact alert speed, scanning configuration, and alert configuration.
Scanning Configuration
If you want to be alerted quickly, you need to scan frequently. If Lansweeper doesn’t have the data, it cannot send out the alert.
The first step is to check your scanning targets. Most scanning targets have the option for a recurring scanning schedule starting from 1 minute. This means that in theory, an asset can be scanned once per minute. However, you don’t want to do this on many machines as it will cause a significant load on your server and can conflict with other scanning schedules. If scanning an asset takes longer than the recurring setting, it will cause your scanning queue to simply fill up with scan orders, so choose your recurring accordingly or consider adding additional scanning servers to prevent a bottleneck.
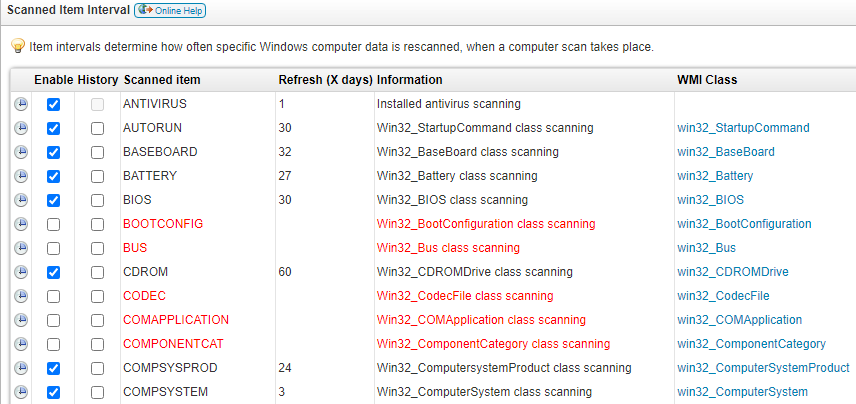
Now that your scanning is sped up, let’s take a look at what you want to scan. Lansweeper does not scan all the data with every scan. This is because it is simply not needed and also improves performance. However, you can customize this (for Windows). If you’re planning on creating an alert of specific data, you might want to check how often that data is scanned by Lansweeper. You can do this in Scanning/Scanned Item Interval. The Refresh number for the scanned items is in days, by setting an item to 0, it is scanned with every scan Lansweeper does.
Alert Configuration
When configuring report alerts, it is important to make sure that the time schedule is set correctly. You can create new time schedules starting from as low as once per minute.
The most critical piece of information to know is that report alerts only send when the report contains data. This is how we can abuse the system later.
Abusing the System
With all of the information we have now, we can start being creative. In this example, we create an alert that notifies us as soon as a device is no longer scannable. This could be a critical server that we need to be notified of ASAP when it goes down, even before it has finished rebooting.
Step 1 – Scanning Target
We always want to choose a scanning target that scans the minimum we need. For this scenario, we do not even need data, just a scan attempt. The “Windows Computer (Eventlog only)” scanning target is best suited since it will only scan 1 item (the event log), this is the most performant option.
Step 2 – The Report
We only want a report that contains data when the machine is failing the scan. We can use the Last Seen and Last Tried data for this. As long as those two are identical, the scan was successful. To ensure we’re not selecting other assets in the report, we can add an extra condition like the asset name, IP address, or MAC address.
Where tblState.Statename = 'Active' and tblassets.IPAddress = '192.168.1.100'
and tblassets.Lastseen < tblassets.Lasttried
Step 3 – Alert Configuration
Time to set up the alert. Choose the report you created, select a time schedule of 1 minute (or whatever schedule you prefer) and you’re all ready.
Another thing to take into account is that the alert will check every minute. This means that if the report has data, it will send an email every minute. It is best to set up your own email filters accordingly.

Create Your Own Advanced Alerts
Now that you know the trick to creating more advanced report alerts you can start thinking about other use cases where a quick alert would be helpful. Whether it is critical services that are no longer running or alerts on warranty information. Literally, every data point in Lansweeper can be used for an alert using this method. Just make sure you manage those emails when they start coming in frequently.